Whether you’re patching up a worn jacket, personalizing a backpack, building out a biker vest, or displaying military honors, sew on patches are the most durable, versatile, and professional way to do it. This guide covers everything: what they are, how to attach them step-by-step, the best stitches, how they compare to iron-on patches, and how to order custom versions made right here in the USA.
What Are Sew On Patches?
Sew on patches are pre-made fabric appliqués, most commonly embroidered, woven, or printed on twill that are attached to a garment or textile by stitching around their perimeter or across their back. Unlike iron-on patches, they carry no heat-activated adhesive on the reverse side, meaning their entire hold comes from thread.
They’ve been a staple of military uniforms, motorcycle culture, scout programs, collegiate letterman jackets, and everyday fashion for over a century. Their appeal is simple: they never fall off, peel, or crack, and when made with quality embroidery thread and a twill base, they outlast the garments themselves.
At The American Patch, every sew on patch we produce starts with a merrow-stitched (overlock) border, the thick, rounded edge that makes embroidered patches so recognizable and is built to hold up through decades of wear and thousands of wash cycles.
Made in the USA: The American Patch produces all custom patches domestically with union-quality standards and same-week turnaround available.
Types of Sew On Patches
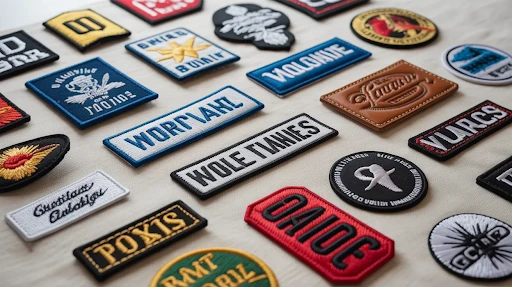
Understanding the types helps you choose the right patch for your garment, application, and aesthetic. Here’s a comprehensive breakdown:
| Type | Construction | Best For | Detail Level | Durability |
| Embroidered Sew On Patches | Thread stitched over twill base, 50–100% thread coverage | Jackets, uniforms, clubs, logos | Medium–High | Excellent |
| Woven Sew On Patches | Thread woven directly into the patch, no base fabric | Fine text, small details, name patches | Very High | Excellent |
| Printed / Sublimated Patches | Full-color print on fabric or PVC | Photos, gradients, photo-realistic designs | Unlimited color | Good |
| PVC / Rubber Sew On Patches | Molded soft PVC with stitching holes around the edge | Tactical, outdoor, military, sports | Medium–High | Excellent |
| Chenille Sew On Patches | Raised, fuzzy chenille yarn on felt/wool base | Letterman jackets, varsity, collegiate | Low (iconic shapes) | Excellent |
| Leather Sew On Patches | Genuine or faux leather with embossed or printed design | Biker vests, denim jackets, boots | Medium | Excellent |
| Name / Text Sew On Patches | Embroidered or woven name on twill bar | Uniforms, work shirts, military | Text only | Excellent |
| Reflective Sew On Patches | Reflective material with embroidered or printed design | Safety, tactical, law enforcement | Medium | Good |
Popular Sew On Patch Styles by Category
Beyond construction type, patches also fall into recognizable style categories that dominate search demand and buying intent:
Biker / Motorcycle patches
Back rockers, bottom rockers, center patches for MC vests
Military patches
Unit insignia, rank, branch, name tapes, and flag patches (Army, Navy, Air Force)
Scout patches
Boy Scout, Cub Scout, Girl Scout, and Civil Air Patrol merit and rank insignia
Decorative & cute patches
Floral, unicorn, mushroom, funny, pop culture, Marvel & character patches for personal style
Sports patches
Football, team logos, league emblems (e.g., Dallas Cowboys sew on patches)
Logo & brand patches
Corporate, band, event, and organizational branding
Designer patches
High-end and fashion-forward patch designs for couture garments
Appliqué patches
Fabric shapes that decorate children’s clothing, quilts, and home textiles
Skull patches
Popular in biker, rock, and alternative fashion
Looking for something specific? Browse our full range of embroidered patches, including custom designs, stock options, and specialty types.
Sew On vs Iron On Patches: Full Comparison
One of the most common questions we hear: “Is it better to sew or iron on patches?” The honest answer depends entirely on the use case. Here’s the definitive side-by-side breakdown:
| Factor | Sew On Patches | Iron On Patches | Winner |
| Durability | Permanent held by thread, lasts the life of the garment | Semi-permanent heat adhesive weakens after 10–20 washes | Sew On |
| Application speed | 15–30 min by hand; 3–8 min by machine | 1–3 minutes with a hot iron | Iron On |
| Fabric compatibility | Works on virtually all fabrics, including leather, nylon, polyester | Not suitable for leather, delicate synthetics, or heat-sensitive fabrics | Sew On |
| Tools required | Needle, thread, scissors (or sewing machine) | Iron and ironing board | Iron On |
| Professional / Military use | Required for official uniforms | Not accepted for official wear | Sew On |
| Removability | Can be removed by cutting stitches (leaves holes) | Can be peeled off or re-ironed | Iron On |
| Holds on thick fabric | Denim, canvas, leather all fine | Iron-on glue doesn’t bond well to thick fabrics | Sew On |
| Cost | Slightly higher labor cost if outsourced | No additional labor cost | Iron On |
| Wash & wear cycles | Unlimited thread doesn’t degrade in normal washing | Glue eventually dissolves; edges peel after repeated washing | Sew On |
Pro tip — Do both: The most popular professional method is to first iron the patch on for placement accuracy, then sew around the border to lock it permanently. This hybrid approach is widely used by tailors, military personnel, and club members.
How to Sew On Patches by Hand (Step-by-Step)
Hand sewing is ideal when you don’t have a machine available, when the garment is hard to maneuver through a machine (like a structured hat or leather vest), or when you want maximum control over placement and stitch visibility.
What You’ll Need
- Your sew on patch
- Hand-sewing needle (standard for most fabrics; leather needle for leather/denim)
- Thread in a color matching your patch border (polyester or nylon thread is most durable)
- Straight pins or fabric chalk
- Small scissors
- Thimble (optional but recommended for denim and canvas)
1. Position and pin the patch
Lay the garment flat on a hard surface. Place the patch exactly where you want it, center it, and align it with seams or other visual guides. Use 3–4 straight pins through the patch and garment to hold it in place during sewing.
2. Thread your needle
Cut 18–24 inches of thread. Thread the needle, pull both ends even, and tie a secure double or triple knot at the end. Using a doubled thread increases the hold significantly.
3. Start from inside the garment
Push the needle up through the garment fabric from the inside, bringing it out just at the edge of the patch. This hides your starting knot on the interior. Remove pins as you approach them.
4. Work your way around with consistent stitches
Choose your stitch. For beginners, a whip stitch. It is easiest: push the needle up through the patch edge, loop over the edge, and repeat every 3–4 mm. Keep tension consistent, not too loose, not so tight that the fabric bunches.
5. Navigate corners carefully
At corners, take 2–3 stitches close together to ensure the corner is fully secured. This is the most common failure point on hand-sewn patches.
6. Finish and secure the thread
Once you’ve completed the full perimeter, push the needle through 2–3 of your last stitches from the underside to create a loop, then pass through the loop and pull tight. Repeat twice. Trim the thread close to the knot, leaving at least 3mm so it doesn’t unravel.
Time estimate: A standard 3-inch patch takes about 15–20 minutes for a beginner, 8–12 minutes once you’ve done a few. Large back patches (10–12 inches) take 45–90 minutes by hand.
How to Sew Patches On with a Sewing Machine
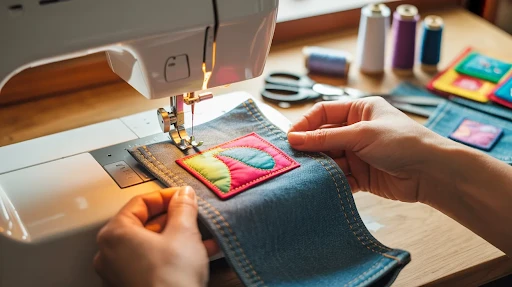
A sewing machine dramatically speeds up the process and produces even, consistent stitches that are difficult to replicate by hand. It’s the preferred method for clothing brands, military contractors, and anyone attaching multiple patches at once.
Machine Setup
- Needle: Universal 80/12 for most fabrics; 90/14 or 100/16 for denim and heavy canvas; leather needle for leather
- Thread: Polyester or nylon, choose a color matching the patch border or garment
- Presser foot: Standard foot for flat patches; open-toe embroidery foot for better visibility at edges
- Stitch: Tight zigzag (stitch width 2–3mm, stitch length 1.5–2mm) OR straight stitch very close to the edge
Step-by-Step: Machine Sewing
Position and pin the patch as described in the hand-sewing section above.
Optionally iron the patch on first (if it has an iron-on backing) to keep it completely stable during machine stitching.
Lower the presser foot onto the patch edge and set your zigzag stitch settings.
Sew slowly along the perimeter, keeping the patch edge centered under the presser foot. Guide the garment, don’t force it.
At corners stop with the needle down, lift the presser foot, pivot the garment, lower the foot, and continue.
Overlap your start point by about ½ inch when completing the perimeter, then back-stitch 2–3 stitches to lock.
Trim threads close to the fabric on both sides and give the piece a light press with an iron.
Sewing patches on hats: Structured caps require a specialized cylinder arm (free arm) machine or a hat-specific attachment. Many embroidery shops offer this service. For unstructured hats, remove the sweatband and use your standard machine’s free arm.
Best Stitch to Sew On Patches
The stitch you choose affects both the strength of hold and the visual appearance. Here’s how each option stacks up:
| Stitch Type | Method | Strength | Appearance | Best For |
| Whip Stitch | Hand | High | Visible diagonal loops can be decorative | Most hand-sewn applications are quick and strong |
| Blanket Stitch | Hand | High | Evenly spaced loops along the edge | Decorative patches, felt appliqués, scout badges |
| Running Stitch | Hand | Medium | Clean dashes along the edge | Light fabrics; not ideal for heavy-duty applications |
| Zigzag Stitch | Machine | Very High | Clean, nearly invisible on textured borders | Machine sewing on any fabric is most professional |
| Straight Edge Stitch | Machine | Medium–High | Clean, minimal, barely visible | Neat, minimalist look on fine or light garments |
| Satin Stitch | Hand or Machine | High | Dense fill looks like embroidery | Fully covering the patch edge for a polished, integrated look |
For pure durability, a machine zigzag stitch wins. For hand sewing, a tight whip stitch is the go-to choice of tailors, military personnel, and experienced patch enthusiasts alike.
Garment-Specific Sewing Guides
Different garments present different challenges. Here’s your go-to reference for the most popular applications:
Jackets (Denim & Canvas)
Denim and canvas are among the easiest fabrics to sew on. Use a denim needle (size 90/14 or 100/16) and polyester thread. For machine sewing, a standard zigzag at medium tension works perfectly. Back patches require patience, consider basting (temporary stitches) first to hold the large patch flat.
Leather Jackets & Vests
Never iron onto leather. Use a leather needle, nylon or waxed thread, and a thimble. Leather doesn’t heal, each needle hole is permanent, so pin carefully and test your placement before committing. A leather machine foot or roller foot makes machine sewing much easier on smooth leather.
Letterman Jackets
Letterman jackets typically combine wool body and leather sleeves. On the wool, sew with a standard needle and wool-compatible thread. On leather sleeves, switch to a leather needle. Many families bring letterman jackets to tailor shops, search “who can sew patches on a letterman jacket near me”.
Jeans & Pants
Denim is thick, use a heavy needle and flatten seams before sewing. For patches on the knee, sew from inside the pant leg with the garment right-side out. Reinforcing with an interior fabric scrap behind the patch area adds longevity to worn denim areas.
Backpacks & Bags
Most backpack fabrics are nylon or polyester. Use a fine needle and light machine tension. For patches on the front pocket (hard to flatten), slip a piece of cardboard inside the pocket to create a firm backing surface while you sew.
Hats & Caps
Patches for hats can be sewn with a standard machine using the free arm. Structured caps require a cylinder-arm machine or, for hand sewing, a curved needle. Reach inside the crown, pull the thread gently to avoid pulling the hat out of shape.
Shirts & Uniforms
Standard shirts use lighter fabric, match your needle and thread weight accordingly (size 70/10 needle, medium-weight thread). For military and work uniforms, consult official placement guides for correct positioning (shoulder, chest, sleeve specifications vary by branch and rank).
Military & Scout Uniforms
Both Boy Scout / Cub Scout and military patches follow strict placement regulations. BSA (Boy Scouts of America) publishes official uniform inspection sheets. Military branches publish AR 670-1 (Army) and equivalent documents. Always sew, never iron on official uniforms. Use a thread color matching the uniform fabric for a neat, regulation-compliant look.
How to Sew Patches on a Leather Vest (Detailed)
Biker culture demands precise patch placement. Rockers, center patches, and side badges all have traditional positioning. Here’s the definitive process for a leather vest:
Lay the vest flat
Mark all patch positions with tailor’s chalk before committing to any stitches.
Use a leather hand-sewing needle
Nylon upholstery thread for maximum grip.
Pre-punch holes
Every 4–5mm around the patch edge using an awl or leather hole punch, which reduces drag and prevents tearing.
Sew through pre-punched holes
With a saddle stitch (two needles, one thread) for hand sewing, or a standard stitch on a walking-foot machine.
Back the patches internally
If the leather is thin, glue a small piece of backing canvas to the interior before sewing to reinforce the stitch area.
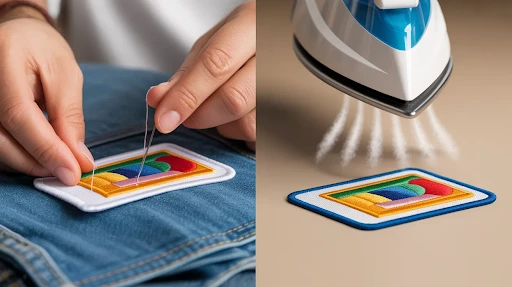
Can You Sew On Iron On Patches? Yes — Here’s How
This is one of the most searched questions in the patch world: can you sew on iron on patches? Absolutely. In fact, it’s one of the most recommended approaches by professional tailors and military personnel.
Iron-on patches have a heat-activated glue (thermoplastic adhesive) on their back. That glue does two useful things when used before sewing:
- It locks the patch in the perfect position so it won’t shift while you stitch around it
- It adds a secondary bond layer beneath your thread, giving the patch dual attachment security
The Best-of-Both-Worlds Method
- Iron the patch onto the garment following standard iron-on instructions (use a cloth between the iron and the patch, press firmly for 25–30 seconds, allow to cool)
- Sew around the full perimeter with a whip stitch by hand, or a zigzag stitch by machine
- Result: a patch that is permanently attached, perfectly flat, and holds even after the iron-on glue eventually wears away from washing
Never iron onto: leather, suede, nylon, polyester blends, spandex, waterproof coatings, or any heat-sensitive fabric. For these materials, sew directly without ironing first.
Custom Sew On Patches Made in the USA
When stock patches don’t fit your brand, club, team, or vision, custom sew on patches are the answer. How custom patches are made at The American Patch is a precise procedure where the customer’s expectations are prioritized. We manufacture fully custom patches whether embroidered, PVC, leather or any patches with your artwork, colors, size, and border type, no design skills required.
| Custom Option | Details |
| Personalized sew on patches | Your name, logo, mascot, or any design embroidered in full color on quality twill |
| Custom name patches | Individual name tapes for uniforms, work shirts, or team gear available in standard military spec or custom layouts |
| Custom sew on patches, no minimum | Order a single patch or thousands. Our process supports both individual orders and bulk production |
| Custom sew on patches in USA | All production is domestic, with no overseas shipping delays, consistent quality control, and fast turnaround |
| Bulk sew on patches | Volume pricing available for 50+ pieces; contact us for team, club, or wholesale orders |
| Logo patches | Perfect for company uniforms, branded merchandise, and promotional products |
| Military & tactical patches | Made to spec with hook-and-loop (Velcro), sew-on, or iron-on backing \regulation colors and thread available |
How to Order Custom Sew On Patches
- Submit your artwork — logo file, hand sketch photo, or describe your idea. Our design team will digitize it at no charge.
- Approve your digital proof — we send a full-color digital mockup before production begins
- Choose your specs — size, thread colors (from 50+ Pantone-matched options), border style (merrow, hot cut, laser cut), and backing type (sew-on, iron-on, Velcro)
- Production & delivery — standard 10–14 business days; rush options available
Start your custom sew on patch order here
Popular custom sew on patch types we produce: custom embroidered patches, custom name patches, biker patches, military patches, sports team patches, scout patches, logo patches, and decorative appliqués.
Where to Get Patches Sewn On Near You
If you’d rather have a professional handle the sewing, several local options exist. Here’s where to get custom patches sewn or attached:
| Location Type | Services Offered | Best For |
| Tailors & alteration shops | Sewing on all patch types; garment prep | Any garment; professional finish |
| Embroidery studios | Patch sewing, on-site embroidery, heat pressing | Uniforms, corporate, bulk orders |
| Leather repair shops | Patches on leather jackets and vests | Biker vests, leather jackets |
| Dry cleaners | Basic patch attachment services at many locations | Simple fabric patches |
| Sporting goods stores | Some offer letter/chenille services for varsity jackets | Letterman jacket patches |
Search tips:
- “places that sew on patches near me” — general tailors and embroidery shops
- “sew patches on letterman jacket near me” — sporting goods or varsity outfitters
- “sew patches on leather vest near me” — leather repair or motorcycle gear shops
- “who can sew on patches near me” — broad search that surfaces all types
Pro Tips, Mistakes to Avoid & Care Instructions
Pro Tips from Our Patch Experts
- Match your thread to the patch border color, not the garment. This makes stitches virtually invisible against the patch’s merrow edge.
- Use a stabilizer or cardboard insert behind the sewing area when working on structured items (hats, thick collars) to prevent the needle from distorting the shape.
- Sew a “tack” stitch in the center of large back patches in addition to the perimeter. This prevents the center from ballooning away from the fabric over time.
- For patches on polyester or nylon, use a fine needle (size 60/8 or 70/10) to avoid leaving visible holes in the synthetic weave.
- Pre-wash your garment before sewing on patches to account for any shrinkage, which prevents puckering later.
- Converting Velcro patches to sew-on? Simply sew through the hook-and-loop base directly onto the garment, or remove the Velcro backing first and sew the patch directly.
Common Mistakes to Avoid
- Skipping the pin step — patches that aren’t pinned shift during sewing, resulting in crooked or puckered placement
- Using too-long thread — anything over 24 inches tangles constantly; cut fresh lengths often
- Uneven stitch spacing — inconsistent gaps are visible on finished work; use a marking pen to mark even intervals for hand sewing
- Ironing onto leather or synthetics — this permanently damages the fabric
- Not back-stitching to finish — without a proper finishing knot or back-stitch, threads unravel after the first wash
Caring for Garments with Sew On Patches
- Wash inside out on a gentle or delicate cycle to protect the thread and the patch surface
- Cold or warm water only — hot water can loosen thread tension over time
- Air dry or low heat in the dryer — high heat degrades embroidery thread faster
- Do not dry clean unless the garment requires it — solvents can affect embroidery thread dyes
- Re-sew any loose corners immediately — catching a loose stitch early prevents full patch detachment
Frequently Asked Questions
What are sew on patches?
Sew on patches are decorative or branded fabric patches stitched directly onto clothing, bags, hats, uniforms, or jackets. Unlike iron-on patches, they are attached permanently with thread, making them more durable for long-term use.
Why are sew on patches popular in Australia?
Sew on patches are popular across Australia because they handle frequent washing, outdoor conditions, and heavy wear better than adhesive-backed patches. They are commonly used by sports clubs, motorcycle groups, schools, workwear brands, and fashion labels.
Are sew on patches better than iron-on patches?
Sew on patches are generally considered more durable because stitching keeps the patch secure even after repeated washing or exposure to heat. Iron-on patches are quicker to apply, but sew on patches usually last longer on jackets, uniforms, and workwear.
Can sew on patches be used on any fabric?
Yes, sew on patches work on most fabrics including denim, cotton, leather, canvas, polyester, and wool. They are especially recommended for materials that may not react well to heat from ironing.
How long do sew on patches last?
With proper stitching, sew on patches can last for many years. Their lifespan depends on the fabric, thread quality, and how often the item is worn or washed.
Are sew on patches washable?
Yes, sew on patches are fully washable. They stay attached more securely than adhesive patches and are ideal for clothing that goes through frequent laundry cycles.
What types of sew on patches are available?
Popular options include embroidered patches, woven patches, chenille patches, leather patches, applique patches, and PVC patches with sewable borders.
Can sew on patches be custom made in Australia?
Yes, many businesses in Australia offer fully customised sew on patches with logos, names, artwork, and unique shapes for brands, clubs, schools, and events.
What is the minimum order quantity for custom sew on patches?
The minimum order depends on the supplier. Some Australian patch makers offer low minimums for small businesses or personal projects, while larger manufacturers may require bulk orders.
How much do sew on patches cost in Australia?
Pricing depends on size, quantity, embroidery coverage, backing type, and design complexity. Simple bulk orders are usually more affordable per piece than small custom runs.
Can sew on patches be removed?
Yes, sew on patches can be removed by carefully cutting and removing the stitches. This makes them easier to replace or reposition compared to permanent adhesive applications.
Are sew on patches suitable for school uniforms?
Yes, sew on patches are widely used on school uniforms because they remain secure during regular washing and daily wear.
Do sew on patches damage clothing?
No, when stitched properly, sew on patches usually do not damage clothing. Small stitch holes may remain after removal, depending on the fabric type.
Can I sew patches on by hand?
Yes, sew on patches can be attached by hand using a needle and strong thread. Many people also use sewing machines for faster and more precise stitching.
Which clothing items work best with sew on patches?
Sew on patches are commonly added to denim jackets, varsity jackets, jeans, backpacks, hats, work uniforms, tactical gear, hoodies, and tote bags.
Ready to Add the Perfect Sew On Patch?
Whether you’re adorning a jacket with custom designs, adding military insignia to a uniform, or personalizing a backpack with something uniquely yours, sew on patches remains the gold standard for lasting, professional patch attachment. They work on virtually every fabric, never peel or crack, and only get better-looking as the garment ages around them.
At The American Patch, we’ve been producing USA-made embroidered patches for individuals, clubs, companies, and military units for years. Our quality speaks in every stitch, and our team is ready to bring your design to life with zero minimum order and full creative support.
No minimums. Free digital proof. Fast USA turnaround. Tell us your vision, and we’ll handle the rest.