You can make your baseball cap or beanie really special with custom patches. Maybe you want to give your friend a gift or start a small business selling custom hats. Making custom patches for hats is a project that you can do by yourself.
In this guide, we will show you everything you should know, including what tools and materials you need. We will also look at the ways to design your patches, along with a simple tutorial on how to make patches for hats that would bring your ideas to reality. Once you read our guide, you can make custom headwear that is all your own.
The Appeal of Custom Headwear
Customizing hats with patches is really popular. There are a few reasons why. Firstly, it is a way to make your hat one of a kind. Secondly, you can put patches on your hat to show what you like. Additionally, you can attach patches of your hobbies or ideas that you believe in or show off your artwork on your hat.
It is also a great gift for people you care about. If you own a business, you can put your company logo on a hat with a custom patch and tell people about your business without spending a lot of money. You can take an old hat and make it look new again, or a hat that is plain can be attached with a custom hat patch to make it look more interesting and personalized.
Essential Tools and Materials
Before starting to make hat patches, get some required tools and materials. The most important thing is the hat itself. You can use a baseball cap or a cozy beanie or a classic trucker hat as the base for your hat.
You need to pick the fabric/material of the patch for your hat design. If you want to do a lot of stitching on your hat, try using cotton twill or canvas. Denim is a strong and classic option. It is great for hats with tough designs.
Felt patches are easy to DIY because of the material. Felt comes in many colors but is not as strong as other fabrics. You can also use leather to make your hat look fancy.
You also need strong embroidery thread to make your hat design look good. Choose thread colors that match your patch fabric. You will need needles to sew on your hat by hand or with a sewing machine. You need scissors to cut your patch fabric and small snippers to cut stray thread.
People often forget to get stabilizers. The stabilizers help keep your patch fabric from getting messed up while you are sewing on your hat. There are different kinds of stabilizers.
A tear-away stabilizer is easy to remove after you finish sewing on your hat. A cutaway stabilizer is good for patch fabrics. A water-soluble stabilizer is great for the edges of your hat design because it dissolves in water.
You will also need something to draw your patch design on your hat fabric. You can use an air-erasable pen or tailor’s chalk.
Other tools are also needed, like embroidery hoops, which keep your fabric tight while you sew your patch design. In addition, a computerized sewing machine helps make patches faster. A digital cutting machine can be needed to cut custom shapes for patches.
Last but not least, you need a way to attach your finished patch design to your hat, for which you can use fabric glue or iron-on patch adhesive backing.
Planning Your Design
Showing off your hobbies, favorite quotes, logos, illustrations, or name initials is possible with custom patches for hats. Think and plan before starting the patch design process.
Got an idea? Draw it on paper. For the first time with DIY hat patches, keeping designs simple is recommended. Complicated details can be difficult to stitch and might also not look good. The usual patch shapes are round or square. Don’t be bound and think about using shields, stars, or shapes that fit your design, and be creative.
Finalize the artwork with the use of bold lines and clear colors so the design stands out. If the patch has text, use big letters so the stitching is simple. They will also be easy to read.
Custom Hat Patch Tutorial
Now we have reached the core of our guide, the custom hat patch tutorial. There are two primary ways to make patches for hats: by hand and by machine. Both yield fantastic results, so choose the best embroidered method to make patches that align with your available equipment and desired aesthetic.
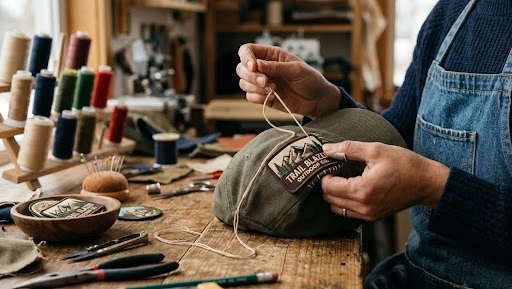
The Hand-Embroidered Method
No special tools are needed to make patches the traditional way. This way of making patches looks DIY and classic. First, you need to cut a piece of fabric for your patch. This piece of fabric should be a little bigger than the patch you want to make. Then, cut a piece of stabilizer of the same size and attach it to the back of the fabric for now.
Use a pen to draw your design right onto the fabric. Now, put your fabric into an embroidery hoop. Pull it tight so it is flat like a drum. Thread a needle. Start sewing over the lines you drew. Different stitching styles used can give your patch different textures. An example is to use a satin stitch to fill in blocks of colors and a backstitch to make the lines look sharp.
After sewing is completed, take the fabric out of the hoop. The stabilizer has to be removed from the back of the patch. Scissors are used to cut the extra fabric around the patch.
A little bit of fabric is left around the edges to support the patch so it does not fall apart over time. Glue the edges in a moderate amount or sew a special blanket stitch to keep the patch from fraying.
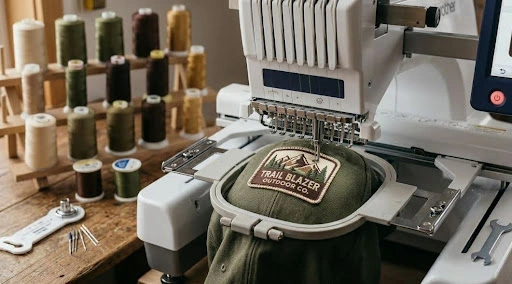
The Machine-Embroidered Method
If you have a sewing machine that can do embroidery, it will be a lot faster. It also gives you a result that looks really professional. You need to turn your design into a file using embroidery software like Wilcom, or you can just buy a file that is already done from the internet.
First, you need to put your fabric and a special stabilizer into the hoop. Then you put the file into the sewing machine computer, thread the colors, and let the machine sew the design onto your fabric. The machine will follow the path that it is told to.
The fabric needs to be taken out of the hoop when the machine finishes working. Cut the stabilizer from the back. Trim the fabric’s stray threads close to the stitches with care, but do not cut the threads that hold it together. You also need to make sure the edges do not fray, like when you do patch embroidery by hand. The best way is to sew a satin stitch around the edges of your patch. This is great at keeping everything in place and gives a nice look.
Attaching the Patch to Your Hat
The last step is putting your patch on your hat for good. There are three popular ways for it. Depending on what your patch is made of and how well you want it to stick to your hat.
The best way is to sew your patch onto your hat. Put your patch where you want it. Insert pins to keep it in place and use a sewing needle with thread of the same color as the edge of the patch to sew around it using a simple stitch. Make sure you only sew through the outside of your hat. Don’t sew through the part that touches your head.
Iron-on adhesive backing is best for fast application. You need to place this under your patch. Place your patch on your hat. Put a piece of cloth or paper over it. This way the iron does not hurt the threads. Press the iron on the cloth for fifteen to thirty seconds. Let your patch and hat cool down completely.
You can use fabric glue too. This way you don’t need heat or threads. Put some glue on the back of your patch. Not too much or it will ooze out of the sides. Place your patch on your hat. Press down on it. Wait for some time for the glue to dry. Then you can wear your hat with your new patch on it.
Let’s have a look at the table below to summarize things:
| Headwear | Recommended Type | Recommended Backing |
| Structured Hats (Trucker) | PVC / Thick Embroidery | Sew-on |
| Dad cap | Woven / Thin Embroidery | Iron-on |
| Beanie | Leather / Woven | Sew-on (Corners only) |
FAQs
How to patch my hat or cap?
A patch can be ironed onto a cap or a hat to personalize it. Additionally, you can also sew it on.
What machine is needed to make hat patches?
A computerized embroidery machine is needed for patch making, and a merrow or overlocking machine is required for patch borders.
What custom patch type serves best for hats?
Woven custom patches are the best because they are durable and also capable of showing complex details like tiny text on your hats or caps.
What is the most secure patch backing or attachment method for my hat?
Sewing on your custom patch is the best way to attach your patch to the hat, as it is the most durable and long-lasting method of patch backing.
Get Customized Patches Made that Complement Your Headwears
Making custom patches for hats is a fulfilling and creative process. With the right tools, a bit of planning, and our step-by-step guide, you will be able to create unique headwear that reflects your personal style.
If you are looking to buy patches instead, The American Patch is the best place to buy custom patches because we specialize in customizing your patches according to your likes and demands. We are trusted by thousands of patch lovers around the USA!
So, grab your materials and make the perfect patch for your hats or simply order it with us online for a hassle-free experience! Happy patching!